• Skip to primary navigation
  • Skip to main content
  • Skip to primary sidebar
  • Skip to footer

SI Parent

Solutions For Parenting In Staten Island

Get Weekly Activities
Emailed To You
Subscribe
  • Connect With SI Parent:
  • Things To Do
  • Directories
    • After School
    • Birthday Parties
    • Summer Camps
    • Pre-School & Daycare
    • Health and Wellness
    • Special Needs
    • Home Improvement
  • Articles
    • Featured Articles
    • Positive Parenting
    • Stuff To Do
    • Coronavirus
    • Babies and Pregnancy
    • Special Needs Articles
    • Recipes and Food
    • Health and Safety
    • School, Camp and Education
    • Richmond University Medical Center
  • Subscribe
    • Newsletter
    • Birthday Club
  • Advertise With Us
  • SI Parent Guides
Archives for 2019

Archives for 2019

40 Halloween Crafts Your Kids Can Make

October 28, 2019 By Staten Island Parent Staff

Get into the spirit of the spooky season with these fun Halloween crafts for kids, many of which can be created from materials you have laying around the house. One of the best parts of Halloween is adorning the house with spooky, ghoulish decorations. These cool and creepy DIYs make great Halloween decorations for your home or your Halloween party.

Here are our favorite Halloween crafts for kids ideas to get you started. They’re great for parents, nannies, or babysitters to do with kids.

Click on a category below to jump to that section:

  • Indoor Decorations
  • Outdoor Decorations
  • Halloween Costume DIYs

Indoor Decor Halloween Crafts for Kids

1. Candy Corn Cones

Head to the craft store to pick up some foam cones, and white, yellow, and orange yarn to make this candy corn decor! Wrap yarn around foam cones to decorate with your favorite Halloween treat. Alternatively, you could paint the cones. What’s more? If you make 10 of these and grab one of your kids’ balls, you have an instant Halloween bowling set!

candy corn cone diy

2. Halloween Banner

Make a banner out of your favorite Halloween characters. Cut scrapbook paper into triangles and let your kids decorate them into spooky, scary, or silly Halloween-themed characters. Then hang a piece of twine or string and use small clothespins to add the faces to the banner! Bonus: This is also an easy way to create custom banners for birthdays, graduations, or any other parties.

halloween banner diy

3. Spooky Floating Tulle Ghost

Welcome trick-or-treaters with this super-easy spooky decoration. All you need is tulle, a styrofoam ball, something to hold the ball, spray starch, and black felt.

View this post on Instagram

A post shared by Smart School House (@smartschoolhouse)

4. Glowing Eyes Wall Art

Creepy, glow-in-the-dark eyes as Halloween decor? Yes, please! Bonus: These are easy to make. Go hunting for some stones with your kids (try to find pairs that are relatively equal in size), then clean them. Next, gather glow-in-the-dark paint, a few extra colors, and paint brushes and get to painting your eyes!

rocks painted as glow-in-the-dark eyes

5. Bottle Bats

Can’t figure out what to do with all those empty soda bottles lying around? Transform them into bottle bats! This relatively easy craft uses recycled materials and items you might just have in your craft box! And if your kids want to flex their creativity muscles, they can use fun colors (think glow-in-the-dark paint!) and find various bits and bobs in the craft box to decorate their bats to give each one a unique personality!

bats made out of bottles for halloween

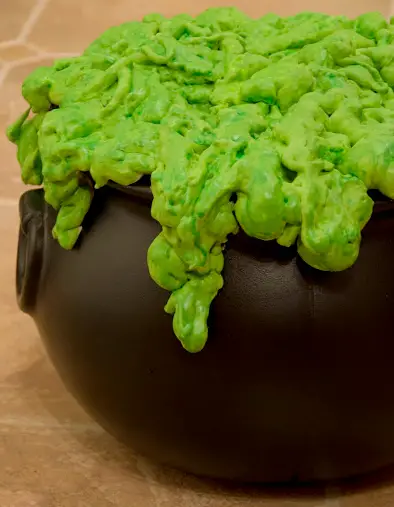
6. Bubbling Cauldron

Please your inner witch—or warlock—with an overflowing cauldron. Add fake bugs and spiders for extra ick! Who woulda thought you could use spray insulation foam to create this awesome Halloween decoration?!

diy bubbling cauldron for halloween

7. Tissue Paper Pumpkins

All you need is tissue paper, pipe cleaners, and scissors for this easy Halloween craft for kids. Have your little ones make a bunch of these and put them in a bowl on your dining room table, place them on your bookshelves or mantle, or simply scatter them around the house for some Halloween vibes. Plus, these pumpkins won’t rot like real ones, so they’ll last through Thanksgiving dinner!

tissue paper pumpkins

8. Jack-o’-lantern Mosaic

This is a great craft activity for kids to make at a Halloween party or in the days leading up to Halloween. Draw the outline on a big piece of paper, then cut up paint swatches in shades of orange, green, and black, and have the kids glue the pieces down to create a monster-sized mosaic. And you don’t have to limit yourself to a jack-o’-lantern, think Frankenstein’s monster, a witch, a ghost, candy corn…you get the idea! Or try the smaller-scale version pictured below.

View this post on Instagram

A post shared by Jessica? Preschool Activities (@theprimaryparade)

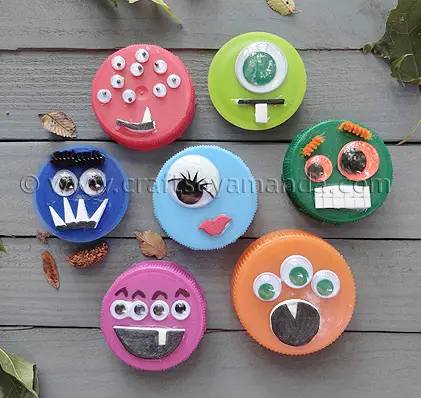
9. Plastic Lid Monsters

Don’t recycle those plastic lids from juice, milk, or salad dressing bottles! Save them to make these creepy creatures for Halloween. Collect the lids starting now, and then come Halloween craft time, give them to your kids, along with a variety of materials for decorations (think: googly eyes in different sizes, pipe cleaners, felt, paper, markers, feathers, beads, and more) and a glue gun. Glue some magnets inside the lids, and you’ll instantly have a family of monsters hanging on your fridge!

plastic lid monster craft for kids

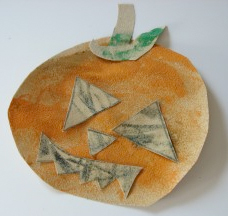
10. Sandpaper Pumpkins

This simple craft can be made using any kind of paper, but the texture of the sandpaper makes it a fun, sensory experience—especially for kids with visual disabilities.

paper pumpkin craft made out of sandpaper

11. Pumpkin Jars

Coat the inside of an empty jar with orange acrylic paint, create a spooky jack-o’-lantern face and you’ll have the perfect decoration. Add in a battery-powered tea light for some festive decor, will with candy to give out as a Halloween party favor, or add some flowers for a cute Halloween vase. Not interested in working with paint? You can make similar jars using orange tissue paper!

View this post on Instagram

A post shared by Easy Kids Crafts – Red Ted Art (@redtedart)

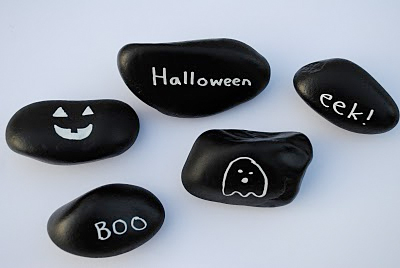
12. Chalkboard Stones

Paint clean rocks with chalkboard paint, and your kids can draw fun Halloween shapes and phrases on them with this simple craft. Bonus: You can change up the drawings on them for each season, making this a DIY you can use year-round. Have extra rocks? Make story stones with them to stretch your family’s imagination muscles.

stones painted with chalkboard paint as halloween decorations

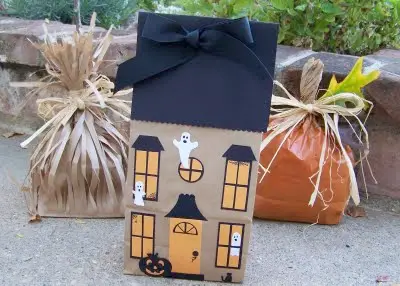
13. Paper Bag Haunted House

No Halloween is complete without a haunted house. Here’s an easy way for kids to create one using a paper lunch bag. You can decorate your house with these mini haunted houses, or use the decorated bags for your kids’ lunches leading up to Halloween!

haunted house made out of a paper lunch bag

14. Paper Cup Spiders

Got lots of those plastic or paper cups in your pantry? Reuse them to create these cute spider crafts that your kids will love to decorate. Place the spiders around your house, or hang them from string for a spooky Halloween mobile!

View this post on Instagram

A post shared by @crafty_nanny_herron_

15. Halloween Candles

Stop by your local dollar store for some clear glass vases or candle holders and let your kids decorate them with paints, ribbons, paper, and more for some beautifully haunting Halloween candles. Then add in some battery-powered tea lights or candles and line your table or windows with them.

glass candle holders decorated for halloween

16. Halloween Hands

This is a classic edible Halloween craft that your kids can hand out to trick-or-treaters, take to school for a Halloween snack, or serve up at your Halloween party. All you need are some clear plastic gloves, popcorn, candy corn, and spider rings, and you’re ready to get making!

17. Window Trees

Transform your house into a haunted house for spooky season with cardboard and black paint! Decide what shapes you want to make (witch silhouettes, ghosts, spooky trees, tombstones, etc) and cut them out of cardboard. Then let your kids help with painting them. Once dry, hang inside on your windows with clear tape, and your neighbors will see a spooky sight!

cardboard cut into tree silhouette in window

18. Tissue Paper Ghosts

Place a sheet or two of white facial tissue over round lollipops and tie with string or white ribbon just below the pop itself. Make ghost faces with a black magic marker. Hang the ghosts and make them float by attaching longer strings to the ghosts’ “necks.”

View this post on Instagram

A post shared by GULF COAST MOM (@thegcmom)

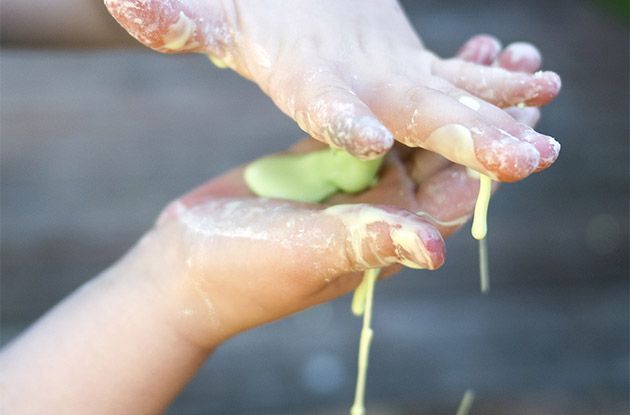
19. Slime…Need We Say More?

Hit the kitchen this Halloween and make a recipe for fun when you learn how to make your own slime. This homemade slime recipe is designed for kids to get their hands dirty, plus it offers sensory stimulation for sight and touch. Prepare to get messy and have a lot of fun with homemade slime.

child's hands holding homemade slime

Outdoor Decor Halloween Crafts for Kids

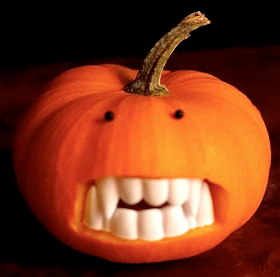
1. Mini Vampire Pumpkins

Transform a cute, innocent baby pumpkin into a scary Dracula! All you need is mini pumpkins, plastic vampire teeth (which you can easily find in the Halloween section of any store this time of year), and sewing pins for eyes. Though, you can use anything for eyes, really…think: beads, pompoms, googly eyes, felt…you get the idea!

mini vampire pumpkin

2. Illuminated Ghost Milk Jugs

Here’s another recycled craft, this time using empty milk jugs. Give your kids (empty, rinsed out) milk jugs and a marker and have them draw silly or spooky faces on them. Then cut a hole in the back and insert a battery-powered tea light to see the faces come to life at night! Line the walkway to your house with these jugs to welcome enthusiastic trick-or-treaters in style.

View this post on Instagram

A post shared by Michelle – Crafty Morning ? (@crafty_morning)

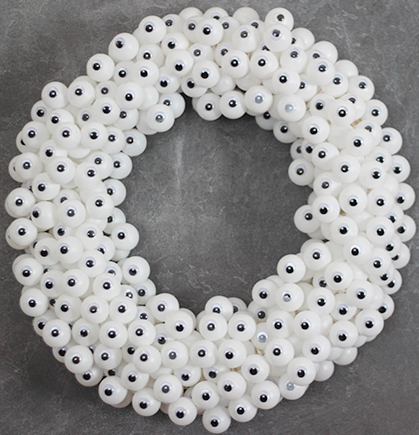
3. Googly Eyes Halloween Wreath

Googly eyes, ping-pong balls, and a wreath form are the basics you need to whip up this eye-catching door decoration! After all, if you put googly eyes on anything, you’ll make people smile.

googly eye wreath for halloween

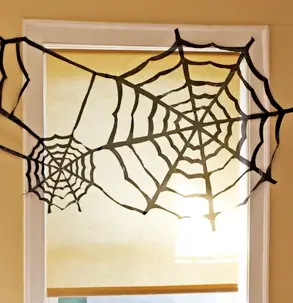
4. Trash Bag Spider Web

Using a similar method to create coffee filter snowflakes, you can turn a boring old garbage bag into an eye-catching spiderweb. It’s perfect Halloween decor for your porch or stoop!

trash bag spider web halloween decoration

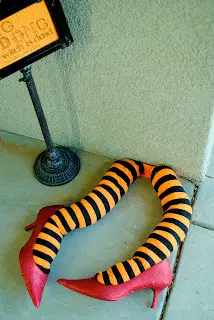
5. Ding Dong the Witch is Dead

Fans of the Wizard of Oz will appreciate this porch decoration. Just stuff some Halloween-themed tights with polyfill, paint an old pair of shoes like ruby slippers, and place the faux legs against the house.

stuffed legs that look like the house landed on a witch

6. Glowing Jack-O’-Lantern Jars

Head to the dollar store and grab some canning jars with lids, glow sticks, and black sharpies to make these cute, colorful decorations! And while the directions call for the glow sticks to be cut open (by an adult!), you could just as easily put the glow stick in the bottom of the jar for a less-messy option. A few things to note from Amanda Formaro, over at Crafts by Amanda: Green and yellow glow sticks work better than other colors and glass markers work better than Sharpies, but either option is fine.
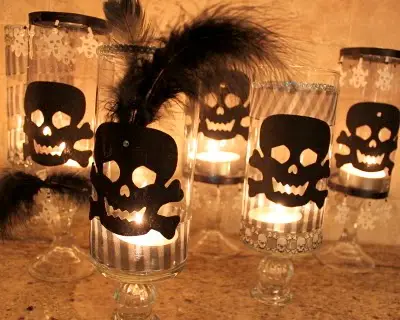
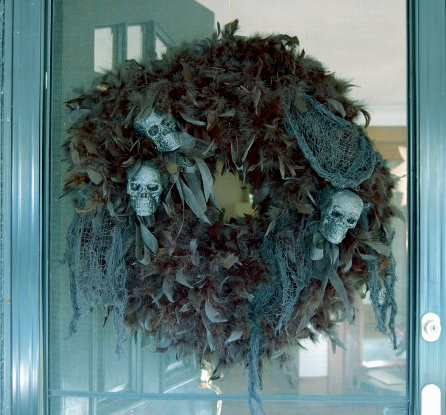
View this post on Instagram

A post shared by Amanda Formaro (@amandaformaro)

7. Halloween Wreath

This creepy, feathery, skull wreath is more involved and better to create with older kids, but it’s  perfect for your Halloween door. And Karen Bertelsen, the blogger behind The Art of Doing Stuff, was able to source all the materials for this from her local dollar store. It may scare away some trick-or-treaters, but that just means more candy for you!

homemade creepy halloween wreath

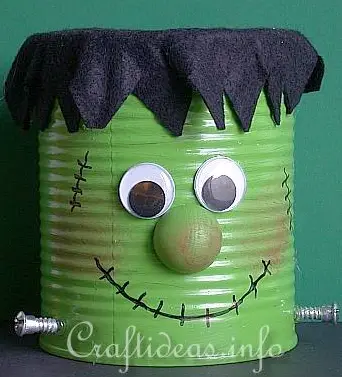
8. Frankenstein’s Monster Can Craft

A great craft for older kids, you can turn an empty paint can into the monster from Frankenstein—then fill it with Halloween candies for the trick-or-treaters, Halloween party attendees, or just you and your kids!
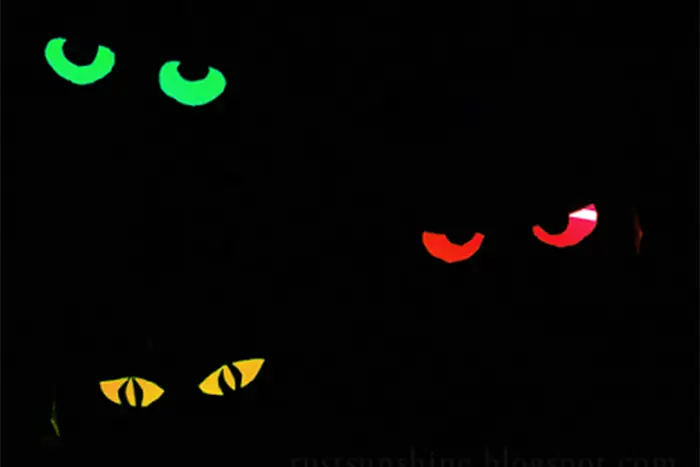
can painted to look like a monster

9. Glowing Eyes

Looking for a quick, easy DIY to scare-ify your yard? Try this idea from RustandSunshine.com: Cut eyes into toilet paper tubes, put glow sticks inside the tubes, and stick the glowing tubes in the trees and bushes around your house. Trick-or-treaters will feel like they’re being watched!

glowing eyes at night

10. Pumpkin Candy Dispenser

Going trick-or-treating with your kids, leaving your door unmanned? Instead of leaving a bowl of candy on the porch, try this: Drill holes in a pumpkin and stick lollipops in the holes.

View this post on Instagram

A post shared by Delicious Decorating ????? (@delish_decorating)

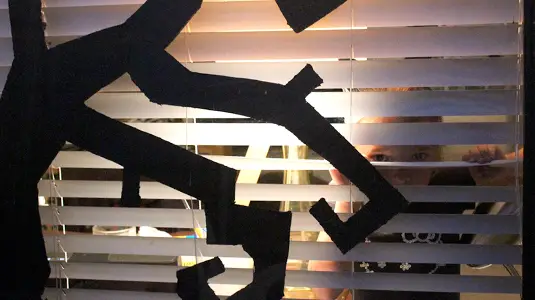
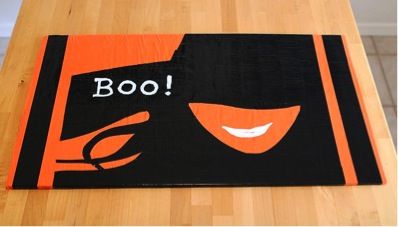
11. Halloween Duct Tape Doormat

Looking for a fun Halloween decor project? This Duct Tape doormat from Stephanie Morgan, founder and managing editor of Modern Parents Messy Kids, is a great one to do with kids. It teaches them about upcycling and only requires a few supplies.

diy duct tape door mat for halloween

You’ll need:

  • a well-worn doormat (preferably one you were getting ready to toss)
  • a few rolls of Scotch® Color & Pattern Duct Tape in Halloween colors
  • a cutting mat
  • a straight edge
  • scissors
  • tape

Directions

  1. Once you have your supplies, go online and find an appropriate Halloween image. Silhouettes work best—try using the “clip art” filter in Google images to find one that will work.
  2. Use photo editing software, such as PicMonkey or Photoshop, to make the image the same size as your doormat and print the image on several pages and lay it out on your doormat to be sure it will work. Then cut out the silhouette on each “quadrant”.
  3. Now it’s time to get to taping! Be sure your doormat is clean, pick a background tape color, and start layering strips onto the top of the mat.
  4. Tuck the ends of each strip under so that your mat looks like this.
  5. Layer several strips of black Duct Tape onto your cutting mat and tape the first image quadrant on top and use the straight edge to cut around the silhouette and remove the excess tape. Repeat this process with each quadrant.
  6. Then line up the four black silhouette pieces on top of your doormat. Don’t worry if it’s not perfect, the tape is very forgiving. If you don’t get it lined up perfectly, you can just add another piece of black tape on top.
  7. The last step is to cut out a spooky message and apply it to the top of your silhouette. I added a few black stripes on each side for visual balance and used glow-in-the dark tape for the wicked smile and the, “Boo!”. It’s quite the creepy look in the dark—perfect for Halloween.

Halloween Crafts for Kids: Costumes

1. Felt Crown

Whether your kid wants to be Max from Where the Wild Things Are or Elsa from—duh!—Frozen for Halloween, they’ll need a crown to complete the outfit. Try your hand at a custom, two-sided felt topper that (bonus!) can be used later for imaginary play from Project Kid by Amanda Kingloff.

View this post on Instagram

A post shared by Project Kid (@amandakingloff)

2. Duct Tape Cape and Mask

Nothing screams DIY quite like Duct Tape—did you know there are scholarships available for teens who make their prom tuxes or dresses out of the sticky stuff? Try your hand at making a Duct Tape cape and mask for a reusable costume (and hey, if you need to fix something, you’ll have tape with you!).

duct tape cape and mask

3. Paper Animal Masks

Is your kiddie an animal lover? Are they dressing as a cat or bird for Halloween? All you need are pants and a sweater in the color of the animal and one of these DIY masks for a completely homemade costume!

View this post on Instagram

A post shared by Lorena Siminovich (@lorenasiminovich)

4. Train Costume

Why buy a kid’s Thomas the Tank Engine costume this Halloween when you can build one? Using cardboard boxes and crafts supplies, follow this step-by-step guide from a Rockland County mom to DIY a train costume for your child.

DIY Thomas the Train Costume

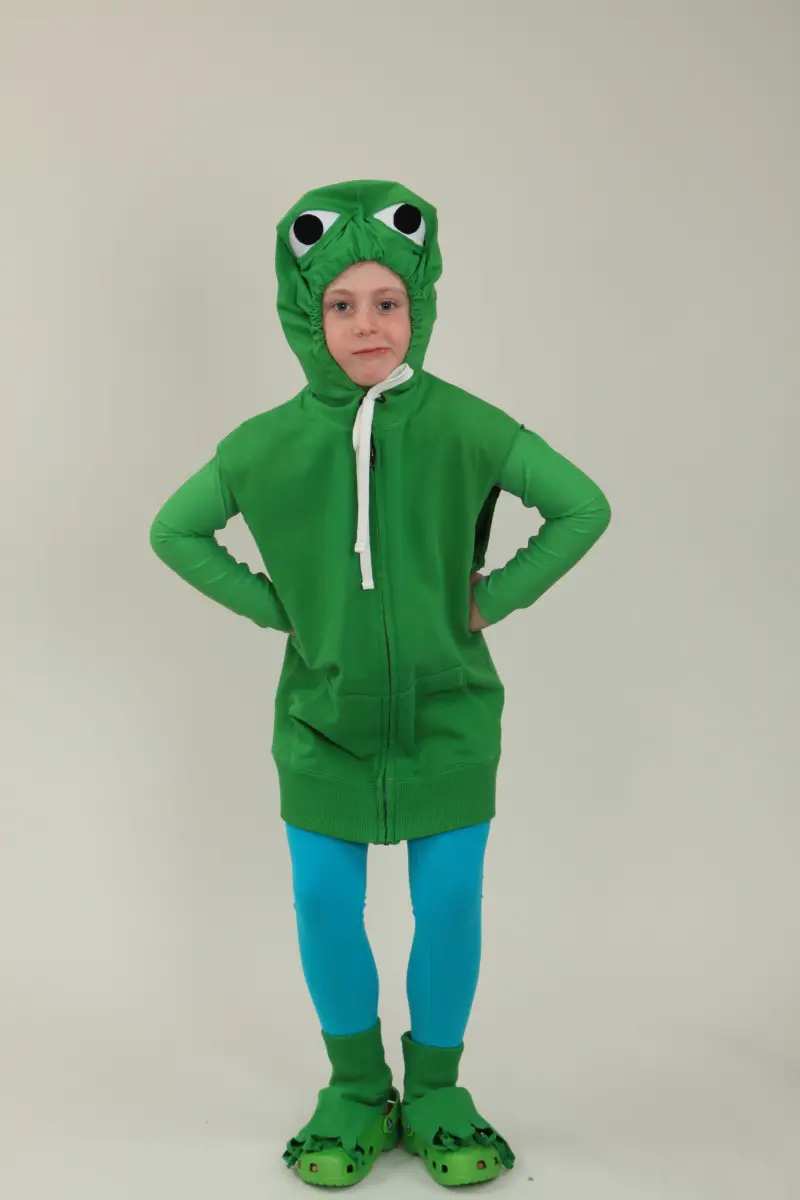
5. DIY Animal Costumes

Have a kid who loves frogs or dogs? Check out these two easy costume DIYs. They’re seriously easy—they both use hoodie sweatshirts as the base for the costume. What could be easier (and keep your kid warm if it’s a chilly Halloween night)? Bonus: These costumes are super budget-friendly!

diy frog costume

6. Toddler No-Sew Tutu

What could be cuter than a toddler dressed as a ghost, with the focal point of the costume being a tutu?! Find out how to make your own with this DIY from Jennifer Garry, the Westchester mom behind the blog CuddlesandChaos.com. Plus, older kids can easily tackle this DIY on their own if their costume requires a tutu.

DIY no-sew ballerina tutu

7-10. Even More No-Sew Costumes

Local parents share how they made DIY costumes for their kids to dress up as grapes, Waldo, a school bus, and Charlie Brown, Lucy, and Linus.

child in diy grape halloween costume


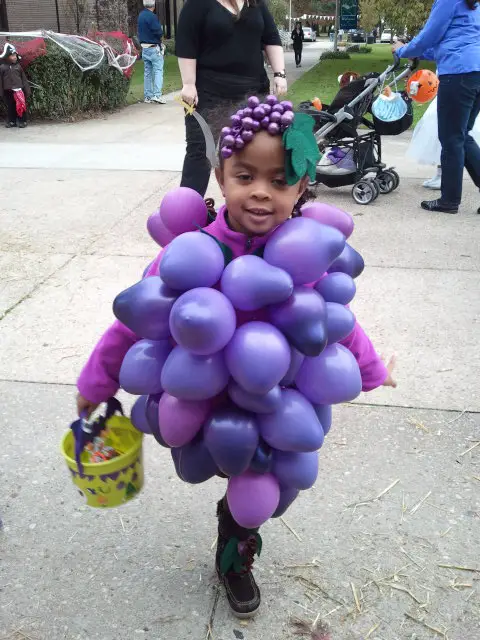
Photo Credit (top of page) Shutterstock / MsMaria


Wanna get news like this sent to you? Get our newsletters packed with ideas, events, and information for parents in Staten Island.

Filed Under: Family Fun, Fall, Featured Articles Tagged With: Halloween

Delicious Fall Recipes

October 28, 2019 By Michelle Yannaco

You’ll absolutely love these fall recipes — Pumpkin Mac And Cheese, Apple Cider Donuts, , Baked Stuffed Pumpkin, Cinnamon Baked Apples, Crispy Acorn Squash Rounds.

Pumpkin Mac and Cheese

Ingredients:

  • 1 pound pasta – elbow, curly, penne – it’s up to you
  • 1/4 cup butter
  • 1/4 cup flour
  • 2 cups milk
  • 2 tablespoons Dijon mustard
  • 1 cup Monterey Jack cheese, shredded
  • 1 cup white cheddar, shredded
  • 1 small yellow onion, diced and sautéed in a little butter until soft
  • 1 ½ cups canned pumpkin puree
  • 1/4 – 1/2 teaspoon cayenne
  • Salt & pepper to taste
  • 3 tablespoons butter
  • 1/2 cup panko bread crumbs

Directions:
Preheat oven to 350 degrees. Cook pasta in a large pot of boiling water, about 1 minute less than directions.

While the pasta cooks, melt butter in a medium sized pot, then whisk in flour to make a thick & relatively lump-free paste. Stir in the milk until smooth and slightly thickened – then add in the Dijon, both cheeses, sautéed onions, pumpkin, cayenne & salt & pepper. Blend everything, then add pasta and combine well – place into an oven proof dish.

Melt the butter in a non-stick pan, add breadcrumbs and mix well to coat – add to the top of the macaroni. Put in the oven and bake 30 minutes or until golden brown & serve.

~Courtesy of Sam the Cooking Guy


Apple Cider Donuts

acd

Ingredients:

  • 3 tbsp. unsalted butter
  • 1/3 c. + 2 tbsp. apple cider
  • 1/2 c. white whole wheat flour
  • 1/2 c. unbleached all-purpose flour
  • 1 tsp. aluminum-free baking powder
  • 1/4 tsp. sea salt
  • 1/4 tsp. cinnamon
  • 1/8 tsp. nutmeg, fresh
  • 1/4 c. sugar
  • 2 tbsp. honey
  • 1 large egg

For the topping:

  • 3 tbsp. butter
  • 1/4 c. apple cider
  • 1/3 c. fine sugar*
  • 1 1/2 tsp. cinnamon

Directions:
Preheat oven to 400 degrees. In a small pot, melt butter. Stir in cider, and set aside to cool.

Meanwhile, whisk together flours, baking powder, sea salt, cinnamon, and nutmeg in a medium bowl. Set aside.
Into the cooled butter mixture, whisk in sugar, honey, and egg until evenly combined. Side note, dip honey measuring utensil in the melted butter first for easy honey removal. Then stir together wet and dry ingredients until just combined. Over-mixing will create a tough donut.

Spray donut pan. Add batter to a piping bag and pipe evenly into the pan. Bake for 7 minutes. Allow to cool 1 minute before removing donuts onto a cooling rack.

Meanwhile, make topping. Melt butter and stir in cider. In a flat-bottomed bowl, mix together cinnamon and sugar (if you don’t have superfine sugar, add sugar to a food processor and quickly pulse until fine, not powdery).

Quickly dip each donut in butter mixture and lightly coat in the cinnamon/sugar mixture. Place back on cooling rack. Best served same day, slightly warmed. If storing leftovers, lightly cover, if at all.

~Courtesy of TheFauxMartha.com


Butternut Squash Risotto

risotto1

Ingredients:

  • 1/2 whole Butternut Squash, Peeled, Seeded, And Diced.
  • 3 Tablespoons Butter
  • 1 Tablespoon Olive Oil
  • 1/2 teaspoon Kosher Salt
  • Black Pepper To Taste
  • 1/4 teaspoon Chili Powder
  • 1/2 whole Diced Onion
  • 1-1/2 cup Arborio Rice
  • 6 cups (approximately) Vegetable Or Chicken Broth (low Sodium)
  • Salt And Pepper, to taste
  • 1/8 teaspoon Turmeric
  • 1/4 cup Heavy Cream (less If Desired)
  • 1/2 cup Parmesan Shavings (more For Serving)
  • Finely Minced Parsley, For Serving

Directions:
Heat 1 tablespoon butter and olive oil in a large skillet over high heat. Add squash and sprinkle with salt, pepper, and chili powder. Cook for several minutes, turning gently with a spatula, until squash is deep golden brown and tender (but not falling apart.) Remove to a plate and set aside.

Heat broth in a saucepan over low heat. Keep warm.

Add 2 tablespoons butter to the same skillet over medium-low heat. Add onions and cook for 2 to 3 minutes, or until translucent. Add Arborio rice and stir, cooking for 1 minute.

Reduce heat to low. In 1-cup increments, begin adding broth to the skillet, stirring to combine and gently stirring as the broth is absorbed. As soon as the liquid disappears, add in another cup to cup-and-a-half of broth. Continue this process, stirring gently as the broth incorporates and the rice starts to become tender. Add salt, pepper along the way.

Taste the rice after about 5 cups of broth have been absorbed and see what the consistency is. Add another 1 to 2 cups of broth as needed to get the rice to the right consistency: it should be tender with just a little bit of “bite” left to it.

When the rice is tender, add in the cooked squash and turmeric and stir it in gently. Add the cream and Parmesan shavings and stir until it’s just combined. Taste and add more salt and pepper as needed.

Sprinkle minced parsley over the top and serve immediately!

~Courtesy of The Pioneer Woman


Baked Stuffed Pumpkin

pumpkin stuffed

Ingredients:

  • 4 oz. sweet Italian sausage
  • ½ c. chopped onion
  • 1 pumpkin
  • ½ c. chopped Granny Smith apples
  • ¼ c. white wine or chicken stock
  • 1 c. Israeli couscous
  • ¼ c. dried cranberries
  • 1 tbsp. extra-virgin olive oil
  • 1 tsp. fresh thyme
  • 1 tsp. fresh oregano
  • ½ tsp. salt
  • ¼ tsp. fresh ground pepper
  • 4 small pumpkins

Directions:
Make the stuffing: Preheat oven to 350 degrees F. Decase and crumble the sausage meat and place it in a large saucepan over medium-low heat. Cook the sausage until it is almost done — about 8 minutes. Remove the sausage from the pan, increase heat to medium, and add the onion and 2 cups of the chopped pumpkin. Sauté until the pumpkin begins to soften — 5 to 7 minutes. Add the chopped apple and sausage and sauté for 3 minutes. Add the wine, cook for 2 minutes, remove from heat, and set aside. Combine the couscous, dried cranberries, olive oil, thyme, oregano, salt, and pepper in a large bowl. Add meat mixture to the bowl and toss to combine.

Bake the pumpkins: Evenly fill the hollowed-out pumpkins with the stuffing mixture and place the pumpkins in a shallow baking dish. Cover the dish with aluminum foil, bake for 25 minutes, remove the foil, and bake for 10 more minutes. Serve immediately.

~Courtesy of Country Living


Cinnamon Baked Apples

apples

Ingredients:

  • 1 teaspoon butter
  • 2 tablespoons brown sugar
  • 3 teaspoons vanilla sugar
  • 3 teaspoons ground cinnamon
  • 1 teaspoon ground nutmeg 6 large apples – peeled, cored, and sliced
  • 3 1/2 tablespoons water

Directions:
Preheat oven to 350 degrees F (175 degrees C). Grease a large baking dish with the butter.

Mix brown sugar, vanilla sugar, cinnamon, and nutmeg in a small bowl. Layer about 1/3 of the apples in prepared baking dish; sprinkle with 1/3 of the sugar mixture. Repeat layers twice more.

Bake in preheated oven for 30 minutes. Pour water over apples and continue baking until tender, about 15 minutes more.

~Courtesy of Allrecipes


Crispy Acorn Squash Rounds

squash

Ingredients:

  • 2 acorn squash, sliced into rounds
  • 1/2 teaspoon salt
  • 1/2 teaspoon pepper
  • 1/4 teaspoon chili powder
  • 1/4 teaspoon nutmeg
  • 1/3 cup whole wheat pastry flour
  • 1/2 cup finely ground cornmeal
  • 3/4 cup whole wheat panko breadcrumbs
  • 6 sage leaves, chopped
  • 3 egg whites, lightly beaten

Directions:
Preheat oven to 425 degrees F. Line a baking sheet with aluminum foil, then place a wire rack on top of the sheet. Spray with non-stick spray.

Peel acorn squash rounds, then sprinkle with salt, pepper, chili powder and nutmeg. In one bowl, add egg whites and lightly beat with a fork. In a second bowl, add flour, sage, cornmeal and breadcrumbs and mix. Coat each squash round in the beaten egg white, then dredge through the cornmeal mixture, pressing to adhere. Gently place on the baking sheet and repeat with remaining squash. Right before baking, mist squash with a spritz of olive oil or non-stick spray.

Bake for 20 minutes, then gently flip (if desired), mist once more, and bake for about 20 minutes longer, or until squash is crispy and golden. Serve with dipping sauce of choice.  Garnish with crispy sage is desired.

Courtesy of How Sweet Eats

Filed Under: Recipes and Food

Lesser-known Symptoms of Breast Cancer

October 28, 2019 By Michelle Yannaco

breast cancer

Public perception that breast cancer is only identified by lumps detected through self-examination or routine mammography may prevent thousands of women from receiving an early diagnosis and the care they need. Although lumps are the most common symptom associated with the disease, women should recognize that breast cancer can produce additional symptoms.

Susan G. Komen for the Cure, one of the premier organizations for breast cancer research, advocacy and treatment, advises that the warning signs for breast cancer are not the same for all women (or men). Various changes in the breast and body can occur, including the following conditions.

• Breast-size changes: Many left and right breasts are not completely symmetrical, and women familiar with their bodies know that one breast is often slightly larger than the other. However, breast-size changes that occur out of the blue may be indicative of a medical problem.

• Skin rash or redness: Women who are breastfeeding can experience a rash on the breasts from an infection of breast tissue. But those who are not breastfeeding should be evaluated by a doctor if redness, irritation or rash appears.

• Nipple changes: Nipple discharge that starts suddenly and is not associated with breastfeeding can be indicative of cancer. Other changes to the nipples, such as pulling in of the nipple (inversion) or itchy, scaling skin on the nipple, should be brought to the attention of a doctor.

• Changes to the skin: Dimpling of the skin, peeling, flaking, or scaling skin can be a cause for concern as well.

• Lumps elsewhere: Cancerous tumors may not only be felt in the breasts. Breast cancer can spread to the lymph nodes around the breasts, and lumps may be felt under the arms.

• Unexplained pain: The Mayo Clinic advises that less than 10 percent of people diagnosed with breast cancer report pain as a symptom. But unexplained pain in an area of the breast should not be ignored. Breast pain that does not go away and seems to involve one area of the breast should be checked.

• Fatigue: General cancer symptoms can include unusual fatigue and unexplained weight loss. These symptoms should not be left unchecked.

One of the best things women and men can do is to familiarize themselves with their bodies so they will be more capable of pinpointing any irregularities that may develop. Individuals can routinely look at their breasts and inspect for subtle changes. But remember that hormonal breast changes occur during the menstrual cycle, so it’s best to be familiar with how breasts look and feel both during and after menstruation.

DID YOU KNOW?
Breast cancer can affect both men and women and is one of the most common forms of cancer. Thanks to increased awareness and screenings, many cases of breast cancer are diagnosed early and treated successfully. BreastCancer.org says that invasive ductal carcinoma, or IDC, is the most common form of breast cancer, accounting for about 80 percent of all breast cancers. The American Cancer Society says that, although IDC can affect women of any age, it is most common among women age 55 or older. The good news is that this type of cancer is highly curable, provided it has not spread outside of the ducts to other breast tissue. Survival rates for any breast cancers diagnosed in the early stages are excellent.

Filed Under: Family Fun

The Cake Smash Craze

October 28, 2019 By Michelle Yannaco

Most children are told not to play with their food from the minute they’re old enough to start feeding themselves. But a fairly new trend on the first birthday scene has little ones doing quite the opposite. A smash cake is a miniature cake, separate from the actual birthday cake, into which the birthday boy or girl may dig, or “smash,” with reckless abandon. The result is (hopefully) several hilarious, picture-perfect minutes of the birthday baby elbow-, face-, even shoulders-deep in yummy frosting.

The cake smash craze first emerged about a decade ago, but its popularity has gained momentum rapidly over the past few years. The ability to easily share pictures, via social media, with endless friends and family members in a single click has caused a major surge in the demand for increasingly camera-ready moments – especially for the proud parent crowd.

It’s really no surprise the cake smash craze has been instated by so many families as a first birthday tradition. A child’s first taste of a sugary-sweet birthday cake is bound to get a little messy; you might as well embrace it!  So do you think your little one can wreck a cake like a pro? Here are a few things to consider.

The Mess is a Must

A messy baby equals cake smash success. In fact, the messier the baby, the better. With any luck, your child will end up wearing more cake than he’s eaten. As such, you need to be prepared for the disaster.

Weather permitting, an outdoor party will provide for the easiest cleanup. If you choose to have the party indoors, be sure to spread an old sheet or table cloth on the floor to catch anything that goes overboard.

If the party is not in your home, remember to bring a change of clothes and a package (yes, a whole package) of baby wipes. You’re going to need them.

If you’d rather not ruin the special birthday outfit, simply strip the baby down to his diaper for cake time. Don’t even bother with a bib, unless it matches your party theme and will make for a cuter picture.

Be selective with your choice of frosting. Dark colors like blue, black, and red will be very hard to clean and may stain your child’s skin for a day or two. Lighter colors like yellow or light pink are less likely to remain on skin and clothes. Not just your child’s clothes, but your own clothes too! Or did you think someone else was going to wipe down your sticky, frosting-covered child?

Be prepared for a mess, but not so prepared that you ruin the moment. The cake smash experience is proof that life’s sweetest moments are sometimes a little messy.

Read Next | Unforgettable First Day Photo Ideas

To Bake or Not to Bake?

When it comes to birthday cake, the possibilities seem endless. Smash cakes are no different. Party planning can be stressful, so you might want to order from a local bakery or cake designer to save yourself the added baking responsibilities. When you purchase the main birthday cake, ask if a smaller cake can be made just for the little guest of honor.

If the party has a particular theme, the smash cake can match the theme. It can be detailed and elaborate, or simple and sweet. As its name indicates, it’s going to end up smashed either way! But you’ll still want a few pre-smashing pictures, so take that into consideration when selecting your cake.

While the child is certainly not going to eat the whole cake, some parents might be concerned about the amount of sugar or artificial ingredients involved. Feel free to ask the bakery if there are healthier options, or you can also research recipes that use applesauce, bananas, or other natural substitutions in place of sugar. Dye-free frosting can be easily made using fruit or vegetable juice (check Pinterest for some good ideas). There are plenty of ways to replace unhealthy ingredients without sacrificing the taste or look of the cake.

When it’s finally cake time, be sure to serve it at room temperature, not straight from the refrigerator. This will make for a softer, more pliable (read: smashable) cake.

Get the Picture

This is a once-in-a-lifetime photo opportunity, so don’t just leave it up to your friends to snap a few good shots with their smart phones and then tag you on Facebook. You definitely want to go pro on this one. Hiring a professional photographer to capture all the chaotic fun of the smash cake will ensure it was worth every adorably messy moment.

With the rising popularity of the cake smash, many photographers have begun to offer special cake smash photo sessions. The pictures are taken a few weeks before the child’s first birthday and often appear on the invitations and thank you cards. As an extension of the cake smash trend, photographers may also include the post-cake bath shots, where the freshly-washed baby is posing inside an old-fashioned water basin or tub.

Pictures taken during the party should be relaxed and fun. Asking the birthday boy or girl to smile or look at the camera could distract from the cake-smashing and make the pictures – and experience – a lot less fun. At least wait until the cake’s been destroyed to start begging her to say cheese!

The smash cake can become an endearing new tradition for your family, one that you’ll remember for years to come. You’ll especially enjoy sharing the pictures with your children once they are old enough to really appreciate them. But kids only get one first birthday and it arrives more quickly than you realize, so don’t waste any time. Go book your photographer, order your cake, and then tell your little one to smash away!

By Jeannine Cintron, who really, really wanted a piece of cake after writing this article. Read her blog at highchairsandheadaches.com.

three kids at preschool
Read Next | Learn about All the Best Pre-school or Daycare Centers on Staten Island

Filed Under: Babies and Pregnancy

2015 Holiday Gift Guide Giveaway Part 1

October 28, 2019 By Michelle Yannaco

This year’s Holiday Gift Guide has something for everyone! We’re giving away over $1000 in prizes to 14 lucky winners throughout November and December.

ask amyAsk Amy Doll
SRP $120 • www.askamydoll.com

With natural-looking moving lips, blinking eyes and the ability to respond to language, Ask Amy is truly unique. The interactive doll is able to respond to a dozen verbal prompts and questions with varied answers, songs and stories.


dino combo

Animal Planet Interactive T-Rex & Discovery Dinopedia Book
SRP $49.94 • www.animalplanet.com • www.discovery.com

It’s one roaringly cool prehistoric package! The T-Rex features swinging head and tail action, motion active lights and sound, plus five touch points that trigger a variety of dino sounds. The Dinopedia book from Discovery’s unique “Opedia” series includes over 400 eye-popping color photos and hundreds of cool dinosaur facts.


MLP Canterlot Castle Playset

My Little Pony Canterlot Castle
SRP $79.99 • www.hasbrotoyshop.com

Create mystical, royal adventures in this incredible three-story castle! Venture up the grand staircase leading to a beautiful throne that can slide up and down between floors. Playset includes a special edition Princess Celestia pony figure, Spike the Dragon figure, tiara and themed accessories.


Play All Day Elmo

Play All Day Elmo
SRP $59.99 • <www.hasbrotoyshop.com

It’s the by the most exciting and playful Elmo to date! Featuring 150+ responses and eight games and activities that will keep little ones laughing all day long.


7-in-1 Multi-Cooker and Fryer-

T-Fal 7-In-1 Multi-Cooker & Fryer
SRP $99.99 • www.t-falusa.com

Time to get cooking! This multi-functioning product features seven versatile cooking functions, allowing the user to fry, braise, sauté, simmer, brown, boil / pasta, and keep food warm. The removable, dishwasher safe bowl with non-stick coating makes for easy clean up.

CLICK HERE to see Part 2 of our Holiday Gift Guide Giveaway


​

Filed Under: Family Fun

Strategies to Help Kids Focus on Schoolwork

October 28, 2019 By Michelle Yannaco

Some youngsters experience difficulty when the time comes to focus on their schoolwork. Such difficulties may be linked to a variety of factors, and parents can be overwhelmed as they attempt to identify the root cause of their youngsters’ struggles in the classroom.

According to the Centers for Disease Control and Prevention, roughly 6.4 million American children between the ages of four and 17 have been diagnosed with attention deficit hyperactivity disorder, or ADHD. ADHD most often occurs in children, and these children may have difficulty with concentrating, paying attention, staying organized, and remembering details. But not all children struggling to focus on their studies have ADHD. Parents who want to help their kids overcome their issues with regard to focusing can consider a host of approaches and strategies.

  • Speak with a qualified healthcare professional. Because ADHD is so common, parents should seek the opinion of a licensed healthcare professional to determine if their child has the disorder. According to the National Resource Center on ADHD (www.help4adhd.org), psychiatrists, pediatricians, neurologists, psychologists, and certain licensed counselors or therapists are qualified to diagnose ADHD. Determining if a child has ADHD is a great first step toward helping that youngster overcome his or her struggles in the classroom. A qualified healthcare professional can help develop a strategy to improve focus, and that may include prescribing medication to improve the child’s ability to concentrate.
  • Speak with your child’s teacher. Students who don’t have ADHD can still have trouble focusing on their schoolwork, and parents of such students may want to speak to their children’s teachers to solve the problem. Educators have significant experience dealing with students who have trouble focusing, and they may be able to make certain suggestions to help kids focus on their work.
  • Minimize distractions at home. Some kids may do well in class but find it hard to focus once they arrive home. That’s because home often has far more distractions than the classroom. Once the time comes for your child to do his or her homework, minimize distractions that can compromise his or her ability to focus. Turn off the television and take kids’ phones away if they have their own phones. During homework time, only allow them to use their computers for their lessons and not to connect with friends via social media. Parents also should make sure they aren’t the distraction. Let kids do their work in peace and quiet, offering to help if need be, but steering clear of kids work areas so they are encouraged to focus and not strike up conversations with mom or dad.
  • Make lists. Some kids focus better when they know exactly what they have to do. Encourage such youngsters to make lists of their assignments and check items off as they are completed. Checking items off can give kids a sense of accomplishment, which can motivate them to stay focused on their schoolwork going forward.
  • Encourage breaks. A breather every so often can help kids avoid growing tired. Make sure kids don’t take up another task, such as playing video games or watching television, during their breaks. But keep in mind that standing up every so often to walk around or get a glass of water can help them.

after school dance class
Read Next | Find Great After School Programs in Staten Island

Filed Under: School, Camp and Education

  • « Go to Previous Page
  • Go to page 1
  • Interim pages omitted …
  • Go to page 53
  • Go to page 54
  • Go to page 55
  • Go to page 56
  • Go to page 57
  • Interim pages omitted …
  • Go to page 61
  • Go to Next Page »

Primary Sidebar

View Local Activities for Kids
  • Talking To Your Kids About September 11
  • Governor Cuomo Says Day Camps Can Open for Summer 2020
  • Here’s Where Kids Can Take Cooking Classes on Staten Island
  • Titanic: The Exhibition Will Open in NYC This Fall
  • Holiday Events in Staten Island for Kids with Special Needs

Staten Island Parent

Staten Island Parent helps parents make better decisions. We have the latest activities and local events that matter to you. Plus many informative articles and important directories including schools, afterschool programs, camps, special needs, birthday parties, health and wellness. Our contests and clubs are fun for the whole family!

    • Browse Past Issues
    • Get Activities & School Info

Footer

si parent logo
Staten Island Parent
One MetroTech Center 3rd Floor
Brooklyn, NY 11201
(646) 559–9100

Important Links

  • Subscribe
  • About Us
  • Contact Us
  • Browse Past Issues
  • Where to Find The Magazine
  • Write For Staten Island Parent
  • Privacy Policy
  • Sitemap

Get Weekly Activities Emailed To You

Subscribe

Copyright © 1989-2025 Staten Island Parent Magazine, All Rights Reserved